February 27, 2012

Paint a Dish Towel


Guess who got a Silhouette Cameo for her birthday??!  Dreams do come true...I did!!  It arrived a few days ago and although my birthday is not for another week, I could see no sense in waiting to try it out.


First project on my list was a painted dish towel.  I found a whisk that I liked in the online Silhouette store, sized it, and had it cut out of contact paper.  I used the negative as a stencil and applied Tulip Fabric Paint like so:


The color is Lime Matte and you can find it JoAnn's.  It dried in about 1/2 an hour and will be okay to wash after 72 hours.


Expect to see more Silhouette projects in the near future!

February 16, 2012

A Beach Bag


Last week I made this beach bag for my sister to take on her vacation to Hawaii!  What I would give for a white sandy beach and 80 degree weather right now!  Definitely jealous :) After searching for the perfect beach bag pattern and not finding it, I looked to my own stash of bags for inspiration.  I ended up choosing a tote bag from AE that I liked and began studying it's seams, trying to figure out how it was put together.  When I couldn't quite grasp what the pattern would look like for the bottom, I decided to do a little seam ripping. It made much more sense after that!  And I now understand the parts of a bag and the order in which to sew them.  If there were only more hours in the day, I think I could design my own pattern!

January 30, 2012

Fabric Checkerboard : X's and O's Edition


The inspiration for a Valentine version of this age old game came after I ordered some blank bottle caps from Pick Your Plum a few weeks ago.  I purchased them thinking I would make something entirely different, but that didn't pan out.  So I got to thinking and came up with the idea to use them as Checkers pieces.  And my incredible husband suggested using fabric as the board!  


Everything turned out just as I had imagined!  I was going for a tattered look on the board, so the edges are raw and in some spots a little turned up.


To show when a piece has been kinged, another X or O can be placed on top of it (as in the O on the third row from the bottom).


A competitive game - hugs and kisses style, and a bottle of Sparkling Cider sound like the perfect take-a-longs to me, for a romantic afternoon in the park!

January 25, 2012

A Lovely Valentine's Wreath


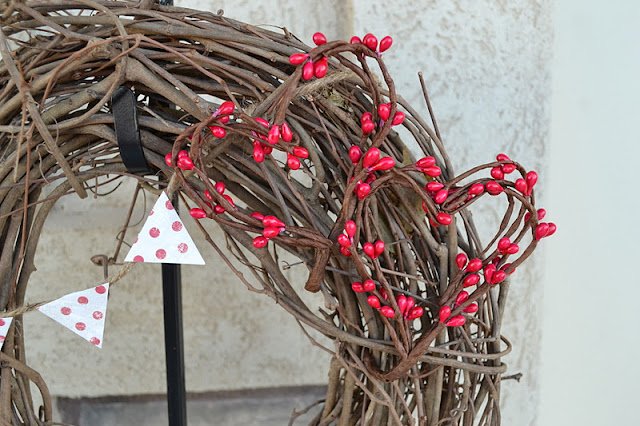
I don't normally do a lot of V-day decorating, but I thought I might get a little more into it this year.  So to start off, here is a lovely little wreath.  I used the same red berries it had on for Christmas, just bent them into hearts and then added a paper banner.  $.25 update!!


To make the banner, I cut a little notch at the top of each pennant, folded it over twine and hot glued it down.


Then I just found a space in between those twisted twigs, slipped the twine in and tied a little knot to hold it.  Twig wreaths are such great decor because they can so easily be changed with the seasons and holidays!


January 16, 2012

Birthday Gift Idea: Indoor Hop Scotch


This idea is pure genius!  Bubble wrap and Hop Scotch, together?!  What little girl wouldn't go crazy over this?  It's a perfect indoor activity for a cold winter's day.  And thanks to giver'slog, I am sending this as a birthday present to my niece first thing tomorrow morning!  I know she will LOVE it.


Want to make one too?  Here's how I did it:

Gather Materials:  Cardboard Box, Bubble Wrap, Yarn, Scissors, Hole Punch, and Sharpies

Step 1:  Cut 10 12"X12" squares of bubble wrap and 2 slightly larger pieces of cardboard.

Step 2:  Using permanent markers, write numbers on the flat side of bubble wrap.
Be sure to write them backwards!

So they look like this when right side up!

Step 3:  Punch holes along each edge of both cardboard pieces

Step 4:  Write the rules down on one of the pieces of cardboard.  They can be found here.

Step 5:  Tape a quarter to the other side.

Step 6:  Sandwich the bubble wrap between the two pieces of cardboard and  thread yarn
 through the holes.  I put a piece of tape around the end of the yarn for easy threading.

Step 7:  Decorate the front however you want!
I'm going to mail this, so I addressed it and it's now ready to take to the post office!

Go ahead, make someone's day!

December 31, 2011

Refinished Table and Chairs


It's finished!  Aah.  You may or may not remember that I started this project back in June. I posted about it in August after I got the first chair done.  Yes, it took another 4 months to finish the other 3 chairs and the table!  I really drug my feet on this one, but now it's done and there couldn't be a better way to end the year!


First I sanded everything down.  If there is one lesson I learned through this whole process, it is to sand, sand, and then sand some more!  I preserved the intricate table top design by staining it, then painted everything else.  I really like the dual color scheme. 


This was definitely not a beginner's project.  Perhaps that is why it took me so long to finish - I am a novice when it comes to refinishing furniture.  So I am proud of myself for pushing through and finally getting it done!


Needless to say, I LOVE how it turned out!  But I will not be attempting any more big furniture makeovers for a very long time!

December 20, 2011

Handmade Gift Exchange: Pretty Accessories


Yesterday I showed you what I sent my partner for The Handmade Gift Exchange.  So today I will share what Mary Katherine sent me.  First off, this ADORABLE hounds-tooth flower headband.


The perfect accessory for Baby J's winter outfit.  I love it.


Second, this pretty tweed brooch.  I was really impressed with the quality of this flower. I've made and bought lots of flowers and this one seems to be put together really well.  The petals were sewn together and the pin on the back is secured with thread as well as glue.  I know it is going to be super durable and am excited to wear it.

And lastly, a set of orange embossed thank you cards that I had been eyeing since I discovered her shop.  Check them out here.  Be sure to hop on over to MKMathews and take a look at all the pretty accessories she has for sale!

Thanks for the handmade gifts Mary Katherine!!
Related Posts Plugin for WordPress, Blogger...