March 27, 2012

Pattern Testing : Little Bow Zipper Wallet

First off, let me introduce you to one of my favorite craft blogs:


I found Michael Ann Made via Craftgawker last year.  Her chalkboard painted cans caught my eye and I have been a follower ever since.  She always has something inspiring going on over there, her latest being a cute zippered wallet.  I happily offered to test out this brand spankin' new tutorial/pattern, which you can now purchase! 

Meet The Little Bow Zipper Wallet.


Isn't it just lovely!?  Michael Ann emailed me the 3 PDF files (pattern, tutorial with pictures, and text instructions) and I downloaded and printed them.  Although I predicted it would take me about an hour to complete, I ended up spending more like 2 1/2 hours on it. There are a few things you have to sew by hand which added a bit of time.  The tutorial was clearly written and very detailed.  The nice thing about this compared to a pattern you would buy at a store is that there are pictures!  It is really helpful to see how to do something before trying it.  Michael Ann also includes a few rather insightful tips!  This is a great beginner's sewing project.  You can purchase the pattern and tutorial here for just $5.50!  

*You may notice mine is just a little different than hers.  I decided to lay my ribbon down horizontally rather than vertically because it was not the same on both sides and it looked better this way!  It is also made for a left handed person (the zipper zips from the right side).  This happened by accident :)

March 19, 2012

Mini Dry Erase Boards


A few months ago, while blog surfing I discovered that I was the lucky recipient of $50.00 worth of supplies from craftvinyl.com!  Talk about a nice surprise!  I wasn't even aware that I had entered a giveaway.  I later discovered that by linking up to her party at Every Creative Endeavor, I had also entered Amanda's awesome giveaway!  So with my credit, I ordered a few sheets of dry erase vinyl and have finally gotten around to using them.  Isn't the mini dry erase board a fun alternative to the chalkboard?!  It's just as easy to make too!


I purchased the unfinished chalkboard at Joann's for a couple of bucks and then sanded off the rough spots.  I used acrylic paint to give it some color and then cut a piece of vinyl to fit inside.  


And now I can't wait for Jayna to wake up from her nap and try it out!

March 7, 2012

Mini Envelope Bookmark and a Book Review


I am having a lot of fun playing with and figuring out my Silhouette Cameo!  Today I made this cute little bookmark out of scrapbook paper.  Two sides are open and two are closed, letting it rest easy on the corner of the page.    


It makes finding your place even easier than a traditional bookmark does!  On the back side, I added a polka dot stamp and am now thinking I need to order the sketch pens for the Silhouette so I can finish it off with an address.


Have you read any good books lately?  My latest read was Diary of a Mad Fat Girl by Stephanie McAfee.  Although I really didn't care much for all the profanity, sex, and infidelity, I found myself turning page after page to find out what was going to happen next.  I didn't enjoy the book, but I couldn't put it down either.  I give it 2 stars.

Loud, outspoken Graciela Jones, aka Ace, is a young high school art teacher who recently left her boyfriend and returned to Bugtussle Mississippi with her chiweenie, Buster Loo.  The drama begins when her best friend Lily bails out on a trip to Florida to spend time with a man she has been very secretive about.  Lily is also a teacher and the next thing you know, she's being accused of sleeping with one of her students and is fired.  The ridiculousness continues and escalates with the discovery that another friend's husband Richard has been cheating on her.  Ace and Lily set out to document his immoral actions and are successful.

All the while, Ace struggles with her body image and won't let herself accept the love of her ex-boyfriend who appears at her doorstep to woo her back.  In the end, Ace finds happiness and so do her two best friends.    

BlogHer Book Club provided me with this book and I was compensated for this review.  All opinions expressed are my own.  To read more about Diary of a Mad Fat Girl and how Stephanie McAfee self published it, visit BlogHer.

February 27, 2012

Paint a Dish Towel


Guess who got a Silhouette Cameo for her birthday??!  Dreams do come true...I did!!  It arrived a few days ago and although my birthday is not for another week, I could see no sense in waiting to try it out.


First project on my list was a painted dish towel.  I found a whisk that I liked in the online Silhouette store, sized it, and had it cut out of contact paper.  I used the negative as a stencil and applied Tulip Fabric Paint like so:


The color is Lime Matte and you can find it JoAnn's.  It dried in about 1/2 an hour and will be okay to wash after 72 hours.


Expect to see more Silhouette projects in the near future!

February 16, 2012

A Beach Bag


Last week I made this beach bag for my sister to take on her vacation to Hawaii!  What I would give for a white sandy beach and 80 degree weather right now!  Definitely jealous :) After searching for the perfect beach bag pattern and not finding it, I looked to my own stash of bags for inspiration.  I ended up choosing a tote bag from AE that I liked and began studying it's seams, trying to figure out how it was put together.  When I couldn't quite grasp what the pattern would look like for the bottom, I decided to do a little seam ripping. It made much more sense after that!  And I now understand the parts of a bag and the order in which to sew them.  If there were only more hours in the day, I think I could design my own pattern!

January 30, 2012

Fabric Checkerboard : X's and O's Edition


The inspiration for a Valentine version of this age old game came after I ordered some blank bottle caps from Pick Your Plum a few weeks ago.  I purchased them thinking I would make something entirely different, but that didn't pan out.  So I got to thinking and came up with the idea to use them as Checkers pieces.  And my incredible husband suggested using fabric as the board!  


Everything turned out just as I had imagined!  I was going for a tattered look on the board, so the edges are raw and in some spots a little turned up.


To show when a piece has been kinged, another X or O can be placed on top of it (as in the O on the third row from the bottom).


A competitive game - hugs and kisses style, and a bottle of Sparkling Cider sound like the perfect take-a-longs to me, for a romantic afternoon in the park!

January 25, 2012

A Lovely Valentine's Wreath


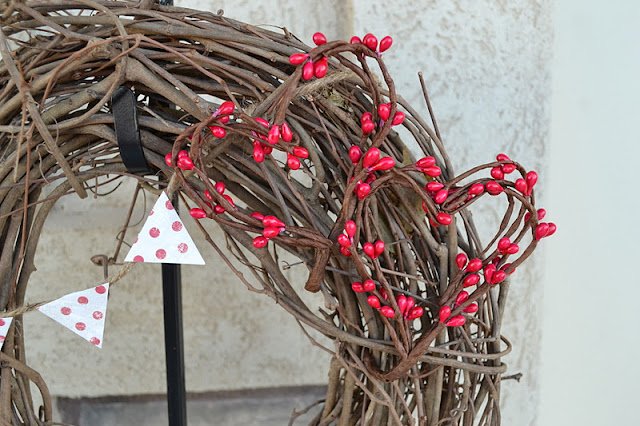
I don't normally do a lot of V-day decorating, but I thought I might get a little more into it this year.  So to start off, here is a lovely little wreath.  I used the same red berries it had on for Christmas, just bent them into hearts and then added a paper banner.  $.25 update!!


To make the banner, I cut a little notch at the top of each pennant, folded it over twine and hot glued it down.


Then I just found a space in between those twisted twigs, slipped the twine in and tied a little knot to hold it.  Twig wreaths are such great decor because they can so easily be changed with the seasons and holidays!


January 16, 2012

Birthday Gift Idea: Indoor Hop Scotch


This idea is pure genius!  Bubble wrap and Hop Scotch, together?!  What little girl wouldn't go crazy over this?  It's a perfect indoor activity for a cold winter's day.  And thanks to giver'slog, I am sending this as a birthday present to my niece first thing tomorrow morning!  I know she will LOVE it.


Want to make one too?  Here's how I did it:

Gather Materials:  Cardboard Box, Bubble Wrap, Yarn, Scissors, Hole Punch, and Sharpies

Step 1:  Cut 10 12"X12" squares of bubble wrap and 2 slightly larger pieces of cardboard.

Step 2:  Using permanent markers, write numbers on the flat side of bubble wrap.
Be sure to write them backwards!

So they look like this when right side up!

Step 3:  Punch holes along each edge of both cardboard pieces

Step 4:  Write the rules down on one of the pieces of cardboard.  They can be found here.

Step 5:  Tape a quarter to the other side.

Step 6:  Sandwich the bubble wrap between the two pieces of cardboard and  thread yarn
 through the holes.  I put a piece of tape around the end of the yarn for easy threading.

Step 7:  Decorate the front however you want!
I'm going to mail this, so I addressed it and it's now ready to take to the post office!

Go ahead, make someone's day!
Related Posts Plugin for WordPress, Blogger...