September 29, 2011

Birthday Party: One Year Old in a Flash


What an exciting year it has been!  I never dreamed parenting would be so fulfilling, trying, or fun.  It has changed my life in so many positive ways.  I am so grateful for the chance to be a mom to this beautiful, healthy baby.  She is so loved. 
We celebrated Jayna's birth and this past year with a picture themed party.  I have Stacy at Elle Belle Creative to thank for the awesome idea. 


We invited friends and family to come for fun, photos, and food.  I knew I would want need to get someone (let's be honest, I am no photographer!)  to come take pictures so I hired Christal Anderson and she did a great job.  I was able to really enjoy the party and not worry about snapping photos.  And they turned out way better than any I would have taken so it was totally worth the money.  She arrived early and we got some of just the three of us and then she manned the "photo booth" as well as took candid shots throughout the party.


The trunk Jayna is sitting on is her time capsule.  We suggested that in the place of a gift, people bring a newspaper clipping, predictions about the future, letters, or photos to put in a time capsule that she will open on her 18th birthday.  I love this idea and am going to do it for all of our future kiddos.  I already have a suitcase I want to use for Calvin (yes I have already named our unborn, unconceived son).  I saw it at the thrift store and thought it would be perfect.  Am I crazy?  It was a good deal and I love it.  Anyways, Jayna got lots of fun stuff in her capsule: lots of letters, including a 5 pager from her Great Grandma whom she is named after, a cd of popular music from the past year, a movie and a book, and some other stuff!  I don't want to spoil it for her in case someday she reads this, but you get the gist.  
The photo booth was fun for both young and old alike.  I simply hung up a gray twin size flat sheet for the backdrop and made a few photo props.  You can find a tutorial for my giant bow ties here.


The chub-a-wub loved her giant cupcake as you can tell by how much she ate!  
There was a cupcake bar for the rest of us with frosting, nuts, sprinkles, and gummy bears.  


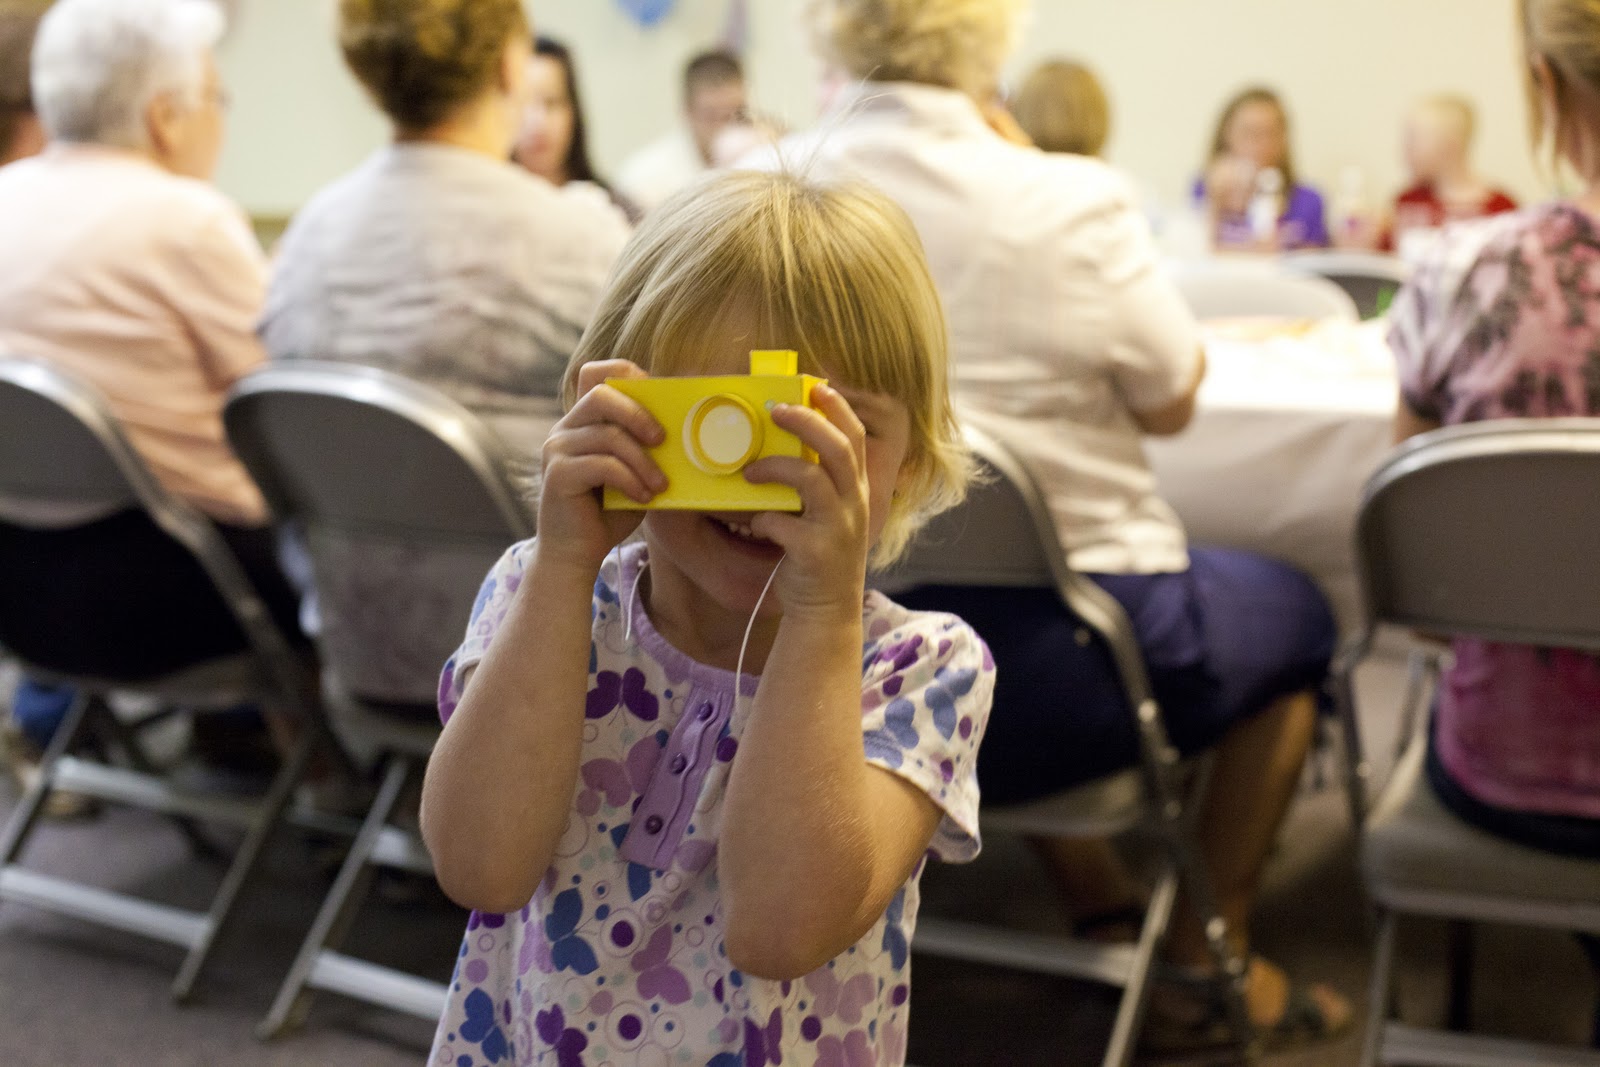
And for favors each of the kids received a baby box camera.  I bought the PDF for these from Etsy seller Mel Stringer.  They were a bit time consuming to put together, but fun once finished!


This babe is ready to take on the world!  She is such a sweet and silly girl.  We can't wait to see what the future brings!

I'm linking up to the Birthday Challenge at the CSI Project!

Visit thecsiproject.com

September 26, 2011

Beginner Needle Felting: Felted Acorns


This morning I tried needle felting for the first time and made this lovely acorn! If you are not familiar with needle felting it is the process of pushing layers of wool together with a spiky long needle that is ultra sharp, resulting in the layers sticking together.  You don't need many materials and it is very simple, but you do need to be super careful as to not poke yourself!

To get started, gather these items:
wool roving
I bought mine at JoAnn's which didn't have a large selection of colors, but something to start out with.  If you don't mind waiting a few days for it to ship and want more variety, search Etsy.  If you aren't sure what wool roving is or want to know more about it, this link will be helpful:  explanation of wool fibers.
- a felting needle
The link above also provides info on different needles.
- a piece of thick foam or a pillow
This is for your work surface.  I used a pillow and it worked just great!
- acorn caps
If you don't have an oak tree nearby, just purchase some caps.  I paid a whopping $2.00 for 50 at Snorkelbuzz
- a glue gun

Once you've got your supplies, get poking!  Pull a small piece of roving apart, roll it into a ball and start poking.  Poke and poke some more until you like how it looks and it is the shape you want.  For a good visual, watch this video tutorial for felted acorns.  Once you get it to the size and shape you want, hot glue it to an acorn cap and it is ready to be used for anything you can imagine up.  I am thinking a garland or wreath or even just in a bowl as some autumn eye candy.  Only time will tell, I've got 49 more caps to fill!


September 24, 2011

AND THE WINNER IS...


Rita!  Random.org picked #4.  Congratulations to you!  I will be contacting you with further details!

Q:  What is your favorite TV show of all time and what episode?
A:  Psych!!! Hands down my favorite show of all time :)
Q:  What is something on your bucket list?
A:  Travel over seas
Q:  Have any pets?
A:  Yes, one cat, Pepper.  She's been my cat since the 8th grade!
Q:  Are you a beach, country, or city person?
A:  I love the country but I definitely miss living near the beach.  And in no way would I consider myself a city person.

She has an etsy shop where she sells beautiful bags:


and blogs at:


THANKS to all who entered!  For those who didn't win, use code SHIPPING1 for free shipping now through
Oct. 1.  It was fun "meeting" you and I now have shows I need to watch, new blogs to follow, and more
items on my wish list!  

September 21, 2011

Connections and a GIVEAWAY!

It's been a few months since Craftaphile was born and I just want to give a little shout out to you, my readers! One of the reasons I started this blog was to connect with fellow crafters, so I hope you are up for a few Q & A's today!  A few of you I know personally and some I have connected with through blogging, but there are many of you I don't know.  And I want to.  Let's be blog friends-k!  So here's to getting to know me better:

Q: What is your favorite TV show of all time and what episode?
A:  Survivor, all the way! P.S. it's on tonight!!  I loved Rudy in the immunity challenge during Survivor Borneo.  "I dunno."  Pretty sure I laughed so hard I cried.  You can watch it here, but you may not think it's funny if you haven't seen the season and gotten to know him.  I highly suggest adding it to your Netflix queue. 
Q: What is something on your bucket list?
A: Give birth naturally.  
Q: Have any pets?
A: Yes, one.  Hermey the hermit crab.  And he's creepy.
Q: What is your biggest fear?
A: Dying young.  I want to live till I'm a hundred.
Q: Are you a beach, country, or city person?  
A: Definitely country.  I grew up in a teeny tiny town and now live in a pretty small city.  Maybe it's just what I'm used to but I love it.  Although, the beach and the city are nice to visit :)

Now I want to hear from you!  Answer one of the Q's or 2 or 3 or all of them!  If you have a blog or etsy shop, leave a link.  I would love to check them out.  And as a thank you for stopping by, I have a special prize for one of you!

A SET OF 4 CORK COASTERS
(Other colors available in my shop or by request)

or
A MEASURING EQUIVALENTS MAGNET SET
(Other colors also available)

So basically, your choice of something from my shop!  To enter, just leave a comment (1 per person) below before I announce the winner on Saturday morning (Sept. 24).  *You must be a follower to win.
Looking forward to getting to know you!

September 15, 2011

Sweater Upcycle

Source
This cardigan has been hanging neglected and unloved in my closet for the past nine months.  I ordered it online from American Eagle and when I got it, it was just a little bit too big.  Instead of going through the hoopla of sending it back I thought it would probably shrink if I washed it in hot water and then it would fit just right.  So I washed it, but to my dismay it didn't shrink.  And into the closet it went.  To stay.  

Until I saw this tutorial from Cheri for an upcycled scarflette!!  But I didn't want to use just part of my cardigan.  If I was going to cut the entire back off, I thought I might as well make something out of the front and sleeves!  So I scoured the web for inspiration and here is what came of it:


A Scarflette    Part of cardigan used:  the back


The fountain of my inspiration, this scarflette is the perfect Fall accessory.  A little added warmth to those breezy autumn afternoons is just what I need!  Check out the tutorial.  Followed it to a T.  Super easy! 

A Button Ring  Part of Cardigan Used:  small piece of a sleeve


I was pleasantly surprised to find a package of 8 or so rings at JoAnn's the other day for just a couple bucks!  After covering a button I glued (using E600) it onto one of the rings and voila!   

A Headband    Part of cardigan used:  a sleeve


When it comes to headbands for me, I like to keep it simple.  Flowers make me feel like a little girl, no offense to those who sport the daisies.  Maybe because I am always putting flowery headbands on my baby.  So, all I did was took a long, inch wide strip of the cardigan, folded it in half and sewed down the length of it.  Then I turned it inside out and slipped an old headband into it, finishing it by pulling it snug and sewing a straight line across both ends and trimming off the excess.

A Keychain Chapstick Sleeve   Part of cardigan used:  end of  a sleeve


No how-to or tutorial for this baby.  Would you be interested in one?  It's another super simple project that you could probably figure out just by looking at.  Of all my new accessories, I think I am most excited about this one.  I am always misplacing my chapstick or digging through my purse trying to find it.  Not anymore!

A Sweater Purse   Parts of cardigan used:  both sides of the front and the buttoned collar


And last but not least, the purse.  Complete with a pocket in the front and conveniently-an adjustable strap.  I didn't follow a tutorial or anything on this one.  My inspiration came as I made the other accessories.  I haven't sewn too many things without a pattern or following a tutorial, so this was particularly satisfying!  Although it is a simple purse, it stimulated my desire to design and create.  

And there you have my reincarnated cardigan, ready to live again.                   
Related Posts Plugin for WordPress, Blogger...